Beginner's Guide: Python in Visual Studio Code (For Ubuntu)
Hello Guys,
This blog
post is about how to use Visual Studio Code as an editor for Python language on Linux
Operating System. Recently I came across VS Code and found it really
beneficial. So, I decided why not try my hand on this and progressively
share my working knowledge with you people. We are going to play with this awesome
editor and try to learn its basic features and see what it offers.
VS Code is Free, Open source, and runs everywhere - Courtesy to Microsoft.
This blog is
specifically directed for Ubuntu, however a lot of these steps will be common
for other platforms too, as VS Code is available for Windows/Mac as well:
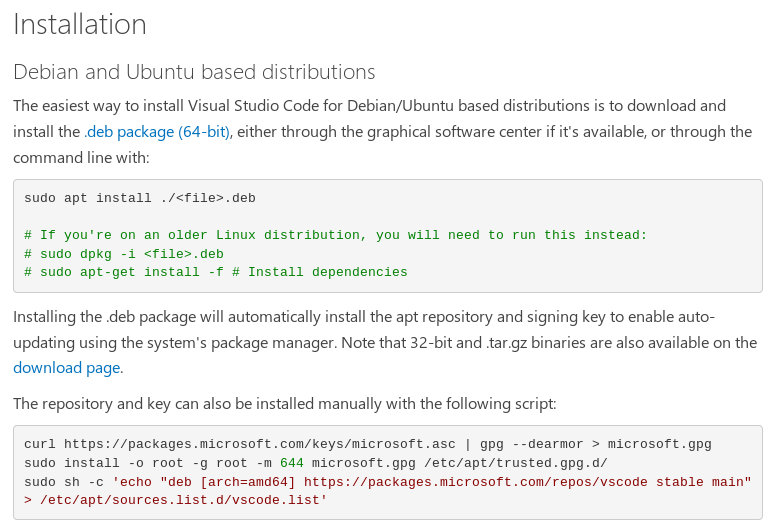
Firstly, we
have to install VS Code by downloading the .deb package from official website and then by typing command on your
terminal:
“sudo apt install ./<file>.deb”
Or you can
also follow the installation link from official website:
 |
| installation |
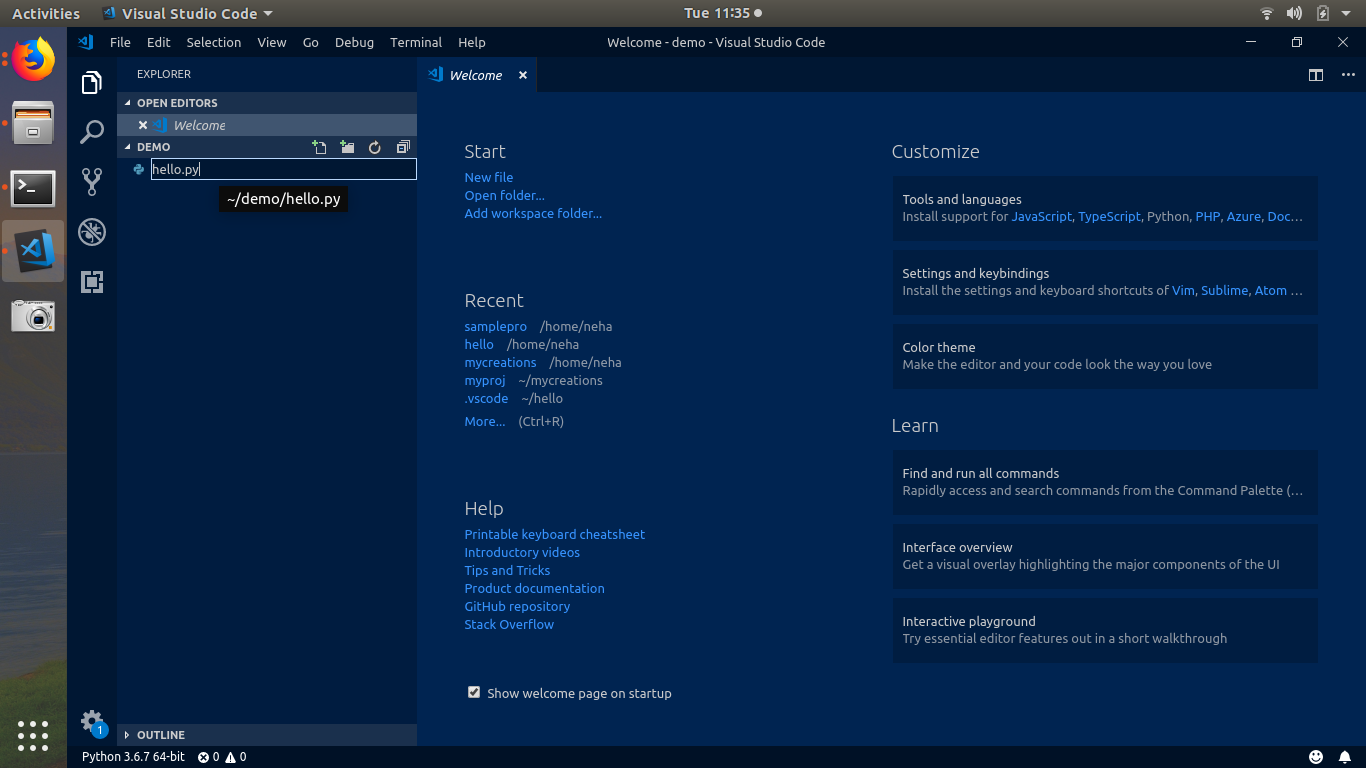
Once the installation is done, you are good to go by launching the application and if you have followed all steps correctly you will get a welcome page as shown in pic.
 |
| welcome page |
If you are
seeing welcome page, you are good to go for next step 👍👍👍
Now let’s go through the basic layout for simple understanding.
 |
| Basic layout |
Basic Layout (as described in official Microsoft Documentation)
VS Code comes with
a simple and intuitive layout that maximizes the space provided for the editor
while leaving ample room to browse and access the full context of your folder
or project. The UI is divided into five areas:
1. Editor - The main area to edit your files. You
can open as many editors as you like side by side vertically and horizontally
2. Side Bar - Contains different views like the
Explorer to assist you while working on your project.
3. Status Bar - Information about the opened project
and the files you edit.
4. Activity Bar - Located on the far left-hand side,
this lets you switch between views and gives you additional context-specific
indicators, like the number of outgoing changes when Git is enabled.
5. Panels - You can display different panels below
the editor region for output or debug information, errors and warnings, or an integrated
terminal. Panel can also be moved to the right for more vertical space.
Each time you start VS Code, it opens up in the
same state it was in when you last closed it. The folder, layout, and opened
files are preserved.
This blog is
based on Python3 and we will learn how to run a simple python “Hello World”
program in VS Code. VS Code is a lightweight Python IDE and proves itself as
the productive alternative to some of the other available IDEs. We will learn
how to edit, run Python code in this post. In upcoming posts I will show how to
debug Python code easily and effectively in VS Code.
Lets get started:
Prerequisites:
Prerequisites:
1. Install a version of Python3:
As I am currently
using “Ubuntu 18.04.1 LTS”, it comes with Python3,
that’s why I don’t need to download it. So, make sure that your system has
python3 installed by running command “python3 --version” in the terminal.
And once it’s installed, verify it by running the command below:
Install the Python extension for VS Code from VS Code Marketplace
The command presents a list of available interpreters that VS Code can find automatically, including virtual environments. If you don't see the desired interpreter, see Configuring Python environments.
After choosing the desired Python default interpreter or python virtual environment, you will see the selected environment on status bar
Name the file as “hello.py”.
By using the .py file extension, you tell VS Code to interpret this file as a Python program, so that it evaluates the contents with the Python extension and the selected interpreter.
Note: THE INFORMATION PROVIDED IN THIS POST IS "AS IS" WITHOUT WARRANTY OF ANY KIND.
 |
| pythonversion check |
In case your system
does not have Python3 installed, you can download it from official site python.org. Currently, you can use the Download Python 3.7.2 button that
appears first on the page (or whatever is the latest version).
(Linux) The
built-in Python 3 installation works well, but to install other Python packages
you need pip.
pip is a package management system used to
install and manage software packages written in Python. Many packages
can be found in the default source for packages and their dependencies — Python
Package Index (PyPI). ... pip is a recursive acronym for "Pip
Installs Packages".
You can install pip
with following command:
$ sudo apt update $ sudo apt install python3-pip |
And once it’s installed, verify it by running the command below:
$ pip3 --version |
The version number
may vary but it looks something like this:
 |
| pipversion check |
Install the Python extension for VS Code from VS Code Marketplace
 |
| VS Code Marketplace |
The list of
available Python Extensions will be displayed select and install the Python
Extension provided by Microsoft as shown in image.
 |
| python extensions |
Start VS
Code in a project (workspace) folder (the Folder where you will be keeping your
code in)
Open the
terminal, create an empty folder called “demo”, navigate into it, and open VS
Code (code) in that folder ( . ) by running the following commands-
 |
| create folder |
By starting VS Code in a folder (here the folder
is “demo”), that folder becomes your "Workspace". VS Code stores
settings that are specific to that workspace in .vscode/settings.json, which
are separate from user settings that are stored globally.
Alternately, you can run VS Code through the operating
system UI, then use File > Open Folder to open the project folder. In
following image, you can see that my current workspace is “DEMO” folder, that
was create earlier.
 |
| demo folder |
Select a Python Interpreter:
Next very important step is to select a Python Interpreter as
Python is an interpreted language. In order to have Python code run/test
smoothly in VSCode, without switching to another terminal window, we need to
tell VS Code which interpreter to use.
From VS Code,
select a Python3 interpreter by opening the Command Palette
(Ctrl+Shift+P), start typing the “Python: Select Interpreter” command to
search.
 |
| select interpreter |
The command presents a list of available interpreters that VS Code can find automatically, including virtual environments. If you don't see the desired interpreter, see Configuring Python environments.
 |
| select python environment |
You can also use
the Select Python Environment option on the Status Bar if available (it
may already show a selected interpreter, too):
 |
| caution select python env |
After choosing the desired Python default interpreter or python virtual environment, you will see the selected environment on status bar
 |
| selected python env |
Create the first Python Hello World source code file
From the
File Explorer toolbar, select the recently created folder “demo Folder” and
click the New File button on it.
 |
| select new file option |
Name the file as “hello.py”.
 |
| rename as hello.py |
And the file
hello.py automatically opens in the editor:
 |
| hello.py file |
By using the .py file extension, you tell VS Code to interpret this file as a Python program, so that it evaluates the contents with the Python extension and the selected interpreter.
Next, start entering the following source code if
using Python 3:
msg = “Hello World!”
print(msg)
|
When you start typing “print”
notice how IntelliSense
presents auto-completion option
 |
| intellisense feature |
IntelliSense and auto-completions work for
standard Python modules as well as other packages you've installed into the
environment of the selected Python interpreter. It also provides completions
for methods available on object types. For example, because the msg variable contains a string, IntelliSense
provides string methods when you type
msg.:
 |
| intellisense feature |
Save the
file(Ctrl+S)
Run Hello World
It's simple to run hello.py with Python.
Right-click in the editor and select Run Python File in Terminal (which
saves the file automatically):
 |
| run hello.py |
The command opens a terminal panel in which your
Python interpreter is automatically activated, then runs python3 hello.py
 |
| terminal output |
This is your OS terminal in VS Code, where you
can do almost anything that you would do in a normal terminal. No need to open
one more terminal window…..One window to rule them all, pretty great – Right?
(wink, wink).
There are two other ways you can run Python
within VS Code:
1. Select one or more lines, then press Shift+Enter or right-click and
select Run Selection/Line in Python Terminal. This command is convenient
for testing just a part of a file.
 |
| alternate way to run |
 |
| python terminal |
2. Use the Python: Start REPL command (from Command Palette:
Ctrl+Shift+P) to open a REPL terminal for the currently selected Python
interpreter. In the REPL, you can then enter and run lines of code one at a
time.
A read–eval–print loop (REPL), also termed an interactive top level or language shell, is a simple, interactive computer programming environment that takes single user inputs (i.e., single expressions), evaluates them, and returns the result to the user; a program written in a REPL environment is executed piecewise.


Well this is all for now, I will be continuing with "How to debug Python code in VS Code " in my next blog " Beginner's Guide: Debug Python Code on VS Code". Till then keep quenching your thirst for CODE... Thanks for your valuable time. Have a nice day :-) 😄
A read–eval–print loop (REPL), also termed an interactive top level or language shell, is a simple, interactive computer programming environment that takes single user inputs (i.e., single expressions), evaluates them, and returns the result to the user; a program written in a REPL environment is executed piecewise.
 |
| select REPL |
 |
| REPL terminal |

Now you can enter
line by line code and run directly there.

Well this is all for now, I will be continuing with "How to debug Python code in VS Code " in my next blog " Beginner's Guide: Debug Python Code on VS Code". Till then keep quenching your thirst for CODE... Thanks for your valuable time. Have a nice day :-) 😄
Note: THE INFORMATION PROVIDED IN THIS POST IS "AS IS" WITHOUT WARRANTY OF ANY KIND.


Very informational. Waiting eagerly for advance topics...
ReplyDeleteThank you
Delete